Still Working on your Halloween costume? Come to “Zombie 101” Wednesday night at 7 PM and learn cool make-up tips and tricks!

Photo by: http://www.flickr.com/photos/doviende/
Still Working on your Halloween costume? Come to “Zombie 101” Wednesday night at 7 PM and learn cool make-up tips and tricks!
Photo by: http://www.flickr.com/photos/doviende/
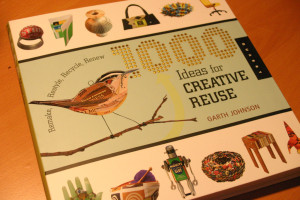
So at the end of last year and into the beginning of 2009, the folks at the extreme craft blog were soliciting for submissions for their 1000 ideas for creative reuse book. And since creative reuse is the very essence of hacking, I decided to submit my ( at the time new ) mp3 grenade project. It got into the book! So my idea is idea number 579 of 1000 fairly amazing ideas. Review and more after the click!

Bill, Alicia, Hilary, Diana and the Cake
NYC Resistor made a huge showing at Yahoo Open Hack Day NYC this year. Team Makerbot showed up with the New York Toast, featuring their latest “Frostruder” prototype, an amazing attachment which turns the Makerbot 3D printer into a confectioner’s dream. And in the spirit of edible technology, Alicia, Bill, Diana and Hilary gathered to create the “Delicious Cake.” The cake was, in fact, NOT a lie.
The Cake represents the sentiment – positive, neutral or negative – of a keyword as represented on Delicious.com, Yahoo’s social bookmarking service. The cake was made to look like the Delicious.com logo, and LED “faces” were used to indicate the sentiment. Hilary wrote the code for the sentiment analysis, Bill wrote the code that drove the Arduino controller, Diana soldered the LED faces, and Alicia assembled the electronics and decorated the cake itself.
You can see more of the cake at Alicia’s Flickr Stream or at Bill’s. We were also featured on CNN: http://bit.ly/ddNm3
Find out more at Diana and Hilary’s blogs:
Diana’s blog: http://fashionnerd.com/2009/10/yahoo-open-hackday-nyc/
Hilary’s blog: http://www.hilarymason.com/blog/yahoo-openhacknyc-the-del-icio-us-cake/
A couple of us helped beautify New York City today. We were part of an effort organized by the Public Ad Campaign to create over 100 installations of art in place of illegal billboards that blight our pedestrian commute.
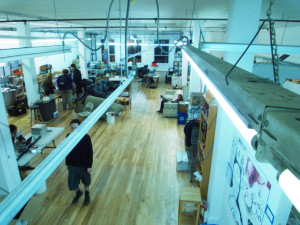
Noisebridge, a hackerspace in San Francisco, is awesome. It’s a very open and wonderfully chaotic space. I have been co-hacking from here while in town and it’s got a fantastic vibe. This picture shows about half of the space. Behind me are two classrooms, a kitchen, a server room, bathroom and more rooms being built out. They have one rule: “be excellent to each other.”
I took a bunch of pictures. Check them all out!
Couldn’t make it to today’s fab class? We made lots of Freeduinos and lit up a bunch of LEDs. There were some potentiometer-controlled servos too!
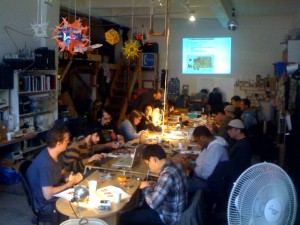
If you still want in on the fun, there will be another opportunity to put together your own Arduino on November 21st. That’s just in time for both Ben’s awesome Put Your Arduino Project On the Web class on the 22nd and another class from Liz and Ryan, Arduino 102/Learn how to control high current loads on December 6th.
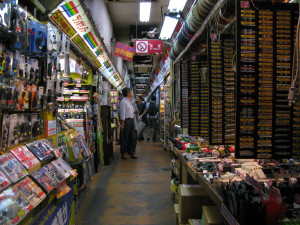
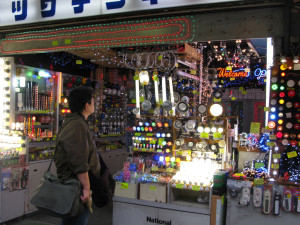
During my recent trip to Japan, I got a quick look at the endless passages of electronic component vendors in Akihabara. Unfortunately, my traveling companions weren’t nearly nerdy enough to spend hours there with me.
I am working on a project, FairytaleFashion.org which uses science and technology to create make-believe fashion in real life. These might be clothes that have blooming flowers, living clothes that breathe, change color, transform. Each Monday, FairytaleFashion.org has a new video that introduces a technology like inflatables, deployable structures, muscle wire and microcontrollers. The viewers are leading the design. At the end of each video is a design question. Answers are used to create designs for Fairytale Fashion. The finished garments will be presented in a fashion show in early 2010.
Here are the first two videos on biomimetics and deployable structures.
How do you imagine Fairytale Fashion using miura-ori structures?
If you are in NYC, please join us for the Fairytale Fashion Design Lab to help us design Fairytale Fashion. This is a free event at Eyebeam Open Studios that is open to all ages.

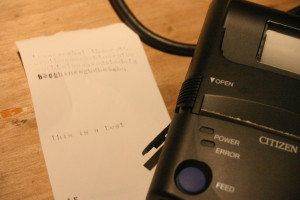
Success! I’ve managed to print to the thermal printer by sending commands over my homemade connector cable in HyperTerminal.
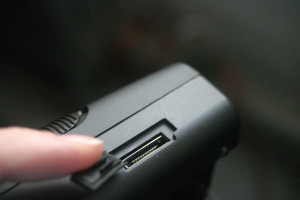
There were a few breakthroughs which helped me get to this point. On the off chance they might answer, I asked the manufacturer for the pinout information for the serial port on the PD-22. Not only did they send me a pin diagram, they also included a schematic for the cable.
 Pins 1-8 are straightforward and what you’d expect to find on RS232. I was originally thrown off because 9 looked like signal ground. Pins 9 and 10 are tied to each other, and go to signal ground internally. I think this is used to indicate that the cable is present, as the printer defaults to IrDA otherwise. I’ve updated the Eagle schematic to tie 9 and 10 together and removed the traces which aren’t connected to anything.
I didn’t have a chance to etch the new board yet, but really wanted to try things out so I made do with the old one by just putting a blob of solder between pins 9 and 10. It’s not very pretty, but it works!
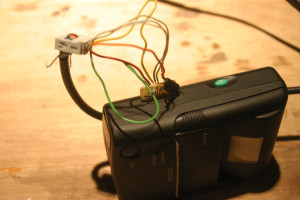
The next step is getting this contraption working with the Arduino instead of running off a USB serial port on my laptop. I have to read up on the SoftwareSerial library, as I haven’t really done anything with it before. I also need to read the command sheet more carefully, I’ve figured out how to print, and turn the thing off via serial, but haven’t got it to feed the paper after printing. Right now I just press the feed button.
But it works!
As part of my knucklebuster hacking project, I’ve been working with a portable thermal receipt printer. I picked up a Citizen PD-22 on eBay at a very attractive price, but later realized why it was so attractive: the printer uses a proprietary RS232 cable, and replacements are hard to come by at any price, much less a reasonable one.
Aside from that hitch, the printer itself is great. I found a full list of the control codes on the manufacturer’s website, and got it to spit out some configuration information. It runs on 4 AA batteries, which fits the bill of "portable electricity" for our show.
The printer also has an IrDA port, but after poking at it for a day and talking to a friend about it, I’m abandoning hopes of getting the Arduino to interface with it. I have a bunch of IR LEDs, but the IrDA protocol is apparently a big pain.
Poking around on DigiKey didn’t bring up any connectors which fit the bill, so at the suggestion of someone on the NYCR Microcontroller Study Group list I set about building my own by etching a tiny PCB with appropriately spaced traces.
 A pair of calipers measured the traces at 0.8mm, so I came up with a board in Eagle, shown at left. It’s super simple, just 10 wires and 10 holes. I plan on using a Makerbot to make a nice little housing for the board, after I trim it down some.
Note that the traces fan out at the end simply because I am not very good at soldering in small spaces, and i wanted plenty of room for error since I was using the toner transfer method of making the PCB.
The board was actually a bit too thick, and while someone more patient might have ordered thinner copper-clad board, I am nothing if not impatient so I took it to the belt sander to remove a little bit of material from the back.
 After some trimming I got something which appears to work! I’ve located power and ground on the pins, but not much else. None of the other pins seem to be saying anything, which is surprising.
Still left to do is drilling out the holes for the wires and soldering them up. Then I’ll cut/file the excess board away and build a little housing for it on a Makerbot. I may decide to re-etch the board with slightly longer traces, right now there’s *just* enough room to clear the printer housing. That and one of the traces didn’t come out quite right (although it’s still serviceable as-is).
Admittedly, I did end up ordering an official cable for the princely sum of $35. I figure I can use it as a control, and to double check that I’ve figured out the pins. So far I haven’t located TX/RX. I would have expected RX to be floating, but my cheap RadioShack multimeter shows no signs of life on the other pins.

