UV cured 3D printing experiments
For today’s #hackfriday at NYC Resistor a bunch of us were inspired by Junior and ScribbleJ‘s 3D printing projects and experimented with UV curing resin using a DLP projector.
We had some JMP UV stamp resin, although it didn’t cure solid with the normal projected image in our test. Even with thirty minutes of exposure, the resin was unchanged in viscosity.

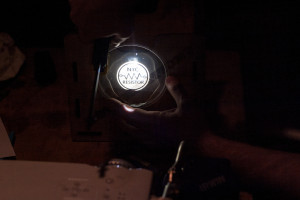
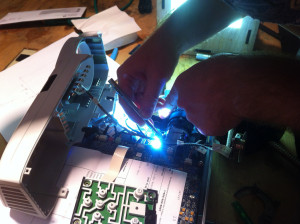
As a next step, we removed the DLP’s mercury arc lamp and drove it positioned just a few cm directly over the resin.
With the interlock defeated and proper safety precautions, the result was a very quickly cured puck of resin. Which is good news, since it means that there is enough light intensity around 380 nm.
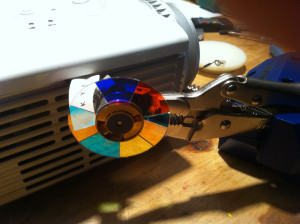
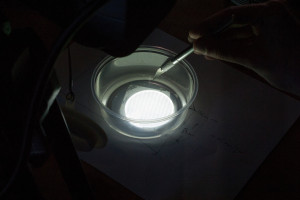
We then removed one of the filters from the light path and the color wheel. The projector wouldn’t turn on with the color wheel removed, so we have it carefully mounted outside of the projector during the next test.
We probed various parts of the light path with a blob of resin to see where it would cure into a solid mass. It appears that the final optic stage before the DLP filters too much of the UV at the necessary wavelengths for this resin.
So we didn’t have total success. Maybe the stamp resin is too insensitive — it is typically exposed via a very strong UV source through a contact print. We’ll order some of the Bucktown Polymers “fast curing” goo for next week’s testing and also start to work on the Z-stage to draw the printed object from the bath once we have the formulation and exposure times experimentally determined.
I assume you’re aware of Junior Veloso’s work on this method? http://3dhomemade.blogspot.com/ He seems to be getting excellent results.
He is mentioned as one of the inspirations for the experiments in the first paragraph.
Reading comprehension fail, doh!
Final stage being the lens unit or just before that?
The final stage before the DLP. After that it goes through the projective lens. We have the PS100-UV for testing tomorrow and I’ll have an updated post sometime.
Any updates, how did the Bucktown Polymers resin work?
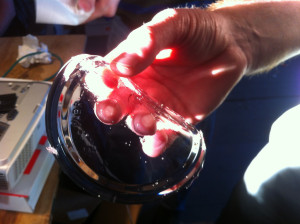
It worked much better — we were able to cure the resin, but as predicated by the lemoncurry crew, our DLP burned out since we had removed the combination UV/IR filter from the lamp. Here’s a photo of the one piece we made before it fried: http://www.flickr.com/photos/osr/6935073638/in/set-72157629756264647/
Before considering modification of the light path please be aware that :
Excessive UV causes corrosive outgassing of lubricants sealed inside the dmd chip which will deteriorate the reflectivity of the micromirror array. Most dmd chips can be replaced for around $100-200 so depending on the speed of this degradation and the ease of replacing the chip in your chosen projector this may or may not be acceptable.
Also, be aware that the majority of projectors use a combined UV/IR filter so you may want to replace the filtering element with an IR only reflector to avoid cooking your DMD should you chose to remove UV restriction in the system.