During my recent trip to Japan, I got a quick look at the endless passages of electronic component vendors in Akihabara. Unfortunately, my traveling companions weren’t nearly nerdy enough to spend hours there with me.


During my recent trip to Japan, I got a quick look at the endless passages of electronic component vendors in Akihabara. Unfortunately, my traveling companions weren’t nearly nerdy enough to spend hours there with me.
I am working on a project, FairytaleFashion.org which uses science and technology to create make-believe fashion in real life. These might be clothes that have blooming flowers, living clothes that breathe, change color, transform. Each Monday, FairytaleFashion.org has a new video that introduces a technology like inflatables, deployable structures, muscle wire and microcontrollers. The viewers are leading the design. At the end of each video is a design question. Answers are used to create designs for Fairytale Fashion. The finished garments will be presented in a fashion show in early 2010.
Here are the first two videos on biomimetics and deployable structures.
How do you imagine Fairytale Fashion using miura-ori structures?
If you are in NYC, please join us for the Fairytale Fashion Design Lab to help us design Fairytale Fashion. This is a free event at Eyebeam Open Studios that is open to all ages.

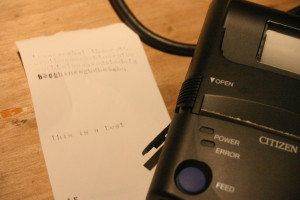
Success! I’ve managed to print to the thermal printer by sending commands over my homemade connector cable in HyperTerminal.
There were a few breakthroughs which helped me get to this point. On the off chance they might answer, I asked the manufacturer for the pinout information for the serial port on the PD-22. Not only did they send me a pin diagram, they also included a schematic for the cable.
 Pins 1-8 are straightforward and what you’d expect to find on RS232. I was originally thrown off because 9 looked like signal ground. Pins 9 and 10 are tied to each other, and go to signal ground internally. I think this is used to indicate that the cable is present, as the printer defaults to IrDA otherwise. I’ve updated the Eagle schematic to tie 9 and 10 together and removed the traces which aren’t connected to anything.
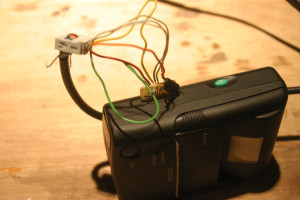
I didn’t have a chance to etch the new board yet, but really wanted to try things out so I made do with the old one by just putting a blob of solder between pins 9 and 10. It’s not very pretty, but it works!
The next step is getting this contraption working with the Arduino instead of running off a USB serial port on my laptop. I have to read up on the SoftwareSerial library, as I haven’t really done anything with it before. I also need to read the command sheet more carefully, I’ve figured out how to print, and turn the thing off via serial, but haven’t got it to feed the paper after printing. Right now I just press the feed button.
But it works!
As part of my knucklebuster hacking project, I’ve been working with a portable thermal receipt printer. I picked up a Citizen PD-22 on eBay at a very attractive price, but later realized why it was so attractive: the printer uses a proprietary RS232 cable, and replacements are hard to come by at any price, much less a reasonable one.

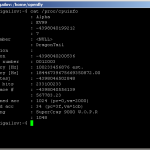
Aside from that hitch, the printer itself is great. I found a full list of the control codes on the manufacturer’s website, and got it to spit out some configuration information. It runs on 4 AA batteries, which fits the bill of "portable electricity" for our show.
The printer also has an IrDA port, but after poking at it for a day and talking to a friend about it, I’m abandoning hopes of getting the Arduino to interface with it. I have a bunch of IR LEDs, but the IrDA protocol is apparently a big pain.
Poking around on DigiKey didn’t bring up any connectors which fit the bill, so at the suggestion of someone on the NYCR Microcontroller Study Group list I set about building my own by etching a tiny PCB with appropriately spaced traces.
 A pair of calipers measured the traces at 0.8mm, so I came up with a board in Eagle, shown at left. It’s super simple, just 10 wires and 10 holes. I plan on using a Makerbot to make a nice little housing for the board, after I trim it down some.
Note that the traces fan out at the end simply because I am not very good at soldering in small spaces, and i wanted plenty of room for error since I was using the toner transfer method of making the PCB.
The board was actually a bit too thick, and while someone more patient might have ordered thinner copper-clad board, I am nothing if not impatient so I took it to the belt sander to remove a little bit of material from the back.
 After some trimming I got something which appears to work! I’ve located power and ground on the pins, but not much else. None of the other pins seem to be saying anything, which is surprising.
Still left to do is drilling out the holes for the wires and soldering them up. Then I’ll cut/file the excess board away and build a little housing for it on a Makerbot. I may decide to re-etch the board with slightly longer traces, right now there’s *just* enough room to clear the printer housing. That and one of the traces didn’t come out quite right (although it’s still serviceable as-is).
Admittedly, I did end up ordering an official cable for the princely sum of $35. I figure I can use it as a control, and to double check that I’ve figured out the pins. So far I haven’t located TX/RX. I would have expected RX to be floating, but my cheap RadioShack multimeter shows no signs of life on the other pins.

The Motor City area has a new hackerspace!!! i3 Detroit held their grand opening this past Saturday 10/3 much to the delight of the geeks of the midwest. They even lured in the mayor of Royal Oak to perform the ribbon cutting. As was fitting, the i3 folks set up a “ribbon” of amphenol cable and gave the mayor an acetylene cutting torch to do the honors.
Though unforch I was out of town for the opening, I was able to get out to i3 a few weeks back to meet a few of the i3 founding members. Led by Russ Wolfe, i3 is filled with super friendly folks overflowing with ideas, talent, and enthusiasm. To boot, their space is DOPE!! Tis ground level with a garage door, electronics lab, classroom, reading loft, and…they’ve got metalworking equipment!!! Oh, dear angle grinder and MIG welder, how I love your sparks, smoke, noise…and how I hope see you join with microcontrollers and heavy duty servos to make robots that fix abandoned buildings! How I would love to see a homebrew alt fuel open source automobile roll out the i3 doors! Pipe dreams?? Only time will tell…
I recently stumbled across a video podcast series on iTunes called EEVblog. It is a simple, low budget affair — just one guy with a camera set up on a tripod in his workshop, but the content is great. The host, David L Jones, is an electronics design engineer in Australia, and his ten minute episodes are chock-full of practical design tips about electrical engineering and product design.
Apparently I’ve been living under a rock for quite some time, because this discovery has led me to several related video blogs that I didn’t know about either, including Ladyada’s Adacast and FatMan and Ciruit Girl. I can’t wait to check those out too.
Are there any other video blogs I’m missing out on? Please comment below!
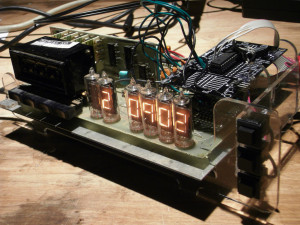
Just before he silently stole away on a secretive mission to distant lands, Ranjit left a hoard of lovely obsolete electronics at the lab. Among the treasures were a couple of old counting units with 7-segment incandescent displays, sometimes called numitrons. I’ve turned this one into a simple clock.
Thanks to Charles for the spare pushbuttons, Ranjit for the original unit, and Evil Mad Scientist for the protoboard.

So way back in the 2.4 Linux kernel days I operated a shell server. It was kind of like a “proto honeypot”. We set it up to portray a bunch of fake information about itself. We then released it into the wilds of IRC claiming it was a “machine we just owned here have a free account.” Then we monitored the systems use via ttysnoop applications and pulled copies of anything uploaded.
The result was we pulled about 4 gigs of exploit archives. And a bunch of logs of people trying to figure out why their x86 exploits weren’t running on the DEC alpha that was pretending to be the wopr.
Anyways, one of the neat side effects of my playing with the proc file system was finding a limit on the upper bounds of top. By setting up procfs to displays stats for 1048 processors I managed to get top to collapse after one iteration of showing cpu usage stats. Added a fun screenshot to the gallery.

Among the fun easy things you can do to tweak your kernel, upping your jiffy count to present 16 years of uptime, and customizing your HZ values are the most fun. I remember running HZ at 1024 back when the rest of the world was rocking it at 100 and slowing themselves down massively. Kernel tweaks are fun, relatively easy, and a great way to learn. Be fearless, be stupid, and be prepared to watch stuff explode catastrophically. But, don’t be afraid to slash and burn and start anew.
I bought these fantastic Apple In-Ear headphones for my iPod 80GB several months back for $79, and found that they worked well with my Macbook. I’ve since moved on from both the iPod and the Macbook, settling on a Nokia n97 mobile phone. I found that the Apple headphones don’t work with these devices naturally and distort the sound. Continue reading »

I don’t know what to say. I’m getting all choked up. It’s just… I’m overwhelmed by the sheer magnificence of this huge list of wonderful classes we have here. I think I’m going to cry. I’ll do my best:
Introduction to Electronics — the standard in getting yourself primed and ready to make awesome things even more awesome. With electricity!
Radio and Antenna Design — Can you believe we even have this class? Amazing!
Bender 101 — Learn to express yourself in 3D, either on the screen or in real solid objects.
Sob sob! Hold on… I’m OK… ahem,
Fire the Lazzzor! — Lasers! Real big giant zappy cutty lasers! Master the power of LASERS!
Electrocardiogram! — Romance and precision instrumentation join together to give your electronics some heart.
Joule Thievery — Get a lot from a little. Squeeeze those electrons and make them do your bidding.
Arduino/Soldering 101 — Double up! Learn so much in one session that your head will pop!
Build Your Own Retro Computer — Are you getting this? Build your own computer. From parts that are not already a computer. This is power.
Cry, cry, honk! Sniff. Running down my face are tears of joy! I’m so glad we had this talk.